

Cart
0

Last Updated: October 22, 2026
Quick Summary
Backpacking stove safety prevents burns, carbon monoxide poisoning, fires, and fuel leaks by setting up your stove at least 15 feet from your tent, inspecting equipment before each trip, and monitoring the flame while cooking. Most accidents are preventable with proper setup and attention.
- Always maintain at least 15 feet of clear space around your cooking area away from your tent and flammable materials.
- Inspect your stove and fuel before every trip for cracks, dents, loose connections, and fuel leaks.
- A healthy flame is blue or blue-green; a yellow or orange flame produces carbon monoxide and means you should stop using the stove immediately.
- Never leave a lit stove unattended and always cook outside in open air, never inside a tent or enclosed space.
- If a flare-up occurs, turn off the fuel valve immediately, step back, and let flames burn out naturally without throwing water on the stove.
Table of Contents
- Why Backpacking Stove Safety Matters
- What You'll Need Before You Start
- How to Use a Backpacking Stove: Step-by-Step
- Backpacking Stove Setup: Choosing the Right Location
- Backpacking Stove Fire Safety: Preventing Burns and Flare-Ups
- Canister Stove Safety: Fuel Handling and Leak Prevention
- Common Mistakes to Avoid
- What to Do During a Fuel Leak, Flare-Up, or Stove Fire
- Frequently Asked Questions
Why Backpacking Stove Safety Matters
Backpacking stove safety is the foundation of every safe camping trip. Burns, carbon monoxide poisoning, fires, and fuel leaks happen fast and without warning.

The good news: most accidents are preventable with the knowledge to set up properly.
Pro Tip
The single biggest mistake beginners make is setting up their stove too close to their tent or gear. Even a small flare-up can ignite fabric instantly. Always maintain at least 15 feet of clear space around your cooking area.
What You'll Need Before You Start
Before your first trip, gather these essentials:
- A backpacking stove (canister, liquid fuel, or alcohol type)
- Fuel appropriate for your stove
- A stable pot or cooking vessel
The Gas Backpacking Stove from GreatAdventureSupply is compact, lightweight, uses standard gas canisters, and folds for easy packing.
The Integrated Heat Collection Stove System includes a built-in pot with measurement markings and piezoelectric ignition, so you won't fumble with matches in cold weather.

For an eco-friendly option, the Bio Fuel Stove burns natural materials like twigs and leaves.
Check your stove's manual before you leave home; models differ in fuel connections, ignition methods, and safety features.
How to Use a Backpacking Stove: Step-by-Step
Step 1: Inspect Your Stove and Fuel Before the Trip
Never wait until you're at camp to check your stove. Problems discovered at home are easy to fix.
Start with a visual inspection:
- Look for cracks, dents, or bent metal on the stove body
- Check all fuel connections for damage or corrosion
- Examine the fuel valve for cracks or loose fittings
Test the ignition system if your stove has one; you should see a spark or hear a click.
For fuel canisters, check the seal; a loose seal or damaged canister will leak fuel.
For liquid fuel stoves, pressurize the tank if required and watch for drips or hissing.
This 10-minute pre-trip inspection prevents most stove emergencies.
Watch Out
Never ignore a fuel leak, even a small one. Fuel leaks can cause fires, carbon monoxide buildup in enclosed spaces, and poisoning. If you find a leak during inspection, do not use the stove, replace the damaged part or the entire unit.
Step 2: Set Up on Level, Stable Ground
Your cooking surface must be flat and stable; an unstable stove tips easily, spilling hot food and fuel. Find level ground away from your tent and sleeping area that doesn't rock or shift, and remove loose rocks, sticks, and debris that can catch fire or destabilize the stove. For extra stability, place your stove on a rock, log, or camp stove table to keep it off wet ground.
Clear a 15-foot radius around your cooking area of all flammable materials:
- Dry grass and leaves
- Tent fabric or sleeping bags
- Backpacks and gear
Wind can carry sparks and flames toward your tent.
Step 3: Light the Stove Safely
Read your stove's ignition instructions before lighting; stove types ignite differently.
For piezoelectric ignition (built-in spark):
- Turn the fuel valve to the "open" position slowly
- Press the ignition button repeatedly until you see a flame
- Adjust the valve to increase or decrease the flame size
- If the ignition fails after 10 attempts, stop and check for fuel or ignition problems
For manual ignition (matches or lighter):
- Turn the fuel valve to "open" slowly, let fuel flow for 2-3 seconds
- Immediately hold a lit match or lighter near the burner
- The fuel should ignite with a small pop or whoosh
- Adjust the valve to control flame size
- Keep your face and hands away from the burner during ignition
For liquid fuel stoves, you may need to prime the burner by heating the fuel line so liquid fuel vaporizes. Follow your manufacturer's instructions exactly.
Never rush ignition; slow, deliberate movements prevent accidents.
Pro Tip
In cold weather or at high altitude, fuel may not vaporize easily. If your stove won't light after 10 attempts, let it sit for a few minutes. Warming the fuel canister in your hands (never over direct heat) can help. For liquid fuel, ensure you've primed the burner according to instructions.
Step 4: Monitor and Adjust the Flame
A healthy flame is blue or blue-green and burns steadily.
Watch the flame color while cooking.
Never leave a lit stove unattended; stay within arm's reach, and shut it down before stepping away.
Keep your pot on the burner; an empty, running stove wastes fuel and can overheat.
Watch for flare-ups: a sudden burst of flame usually means fuel pooled near the burner.
Backpacking Stove Setup: Choosing the Right Location
A good location is level, clear of flammable materials, and far from your tent.
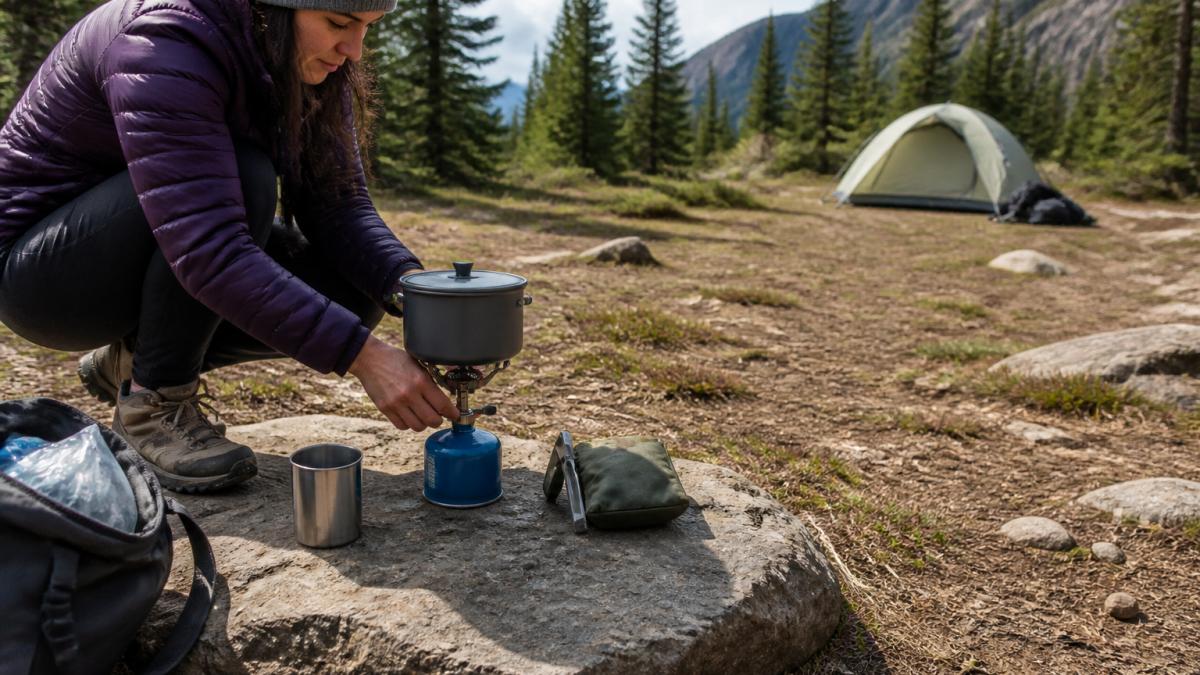
Scout your campsite before sunset.
Never cook inside your tent or under a tarp; enclosed spaces trap carbon monoxide and smoke (the CDC).
If wind blows toward your tent, move the cooking area further downwind; a gust can carry flames or hot debris toward your shelter.
Backpacking Stove Fire Safety: Preventing Burns and Flare-Ups
Burns are the most common backpacking stove injury. Hot metal, boiling water, and open flames cause serious damage in seconds.
Use long utensils and keep your hands at least 12 inches from the flames.
Warn others in camp that the stove is running, and watch for children who might wander too close.
A flare-up happens when fuel ignites suddenly and flames shoot upward, usually when:
- Fuel pools near the burner
- The burner is too hot
- Wind gusts fuel vapors into the flame
If a flare-up occurs:
- Turn the fuel valve to "off" immediately
- Step back and give the stove space
- Do not throw water on the stove, water can cause the flames to spread
- Let the flames burn out naturally (usually 10-30 seconds)
- Wait 2-3 minutes before attempting to relight
Never panic during a flare-up; the flames usually die quickly once you cut off fuel.
Watch Out
A flare-up near your tent or gear is a serious emergency. If flames are spreading toward flammable materials, use a fire extinguisher or water to extinguish them. Have water or a fire extinguisher accessible whenever your stove is running.
Canister Stove Safety: Fuel Handling and Leak Prevention
Canister stoves are popular because they're lightweight and simple. But fuel canisters are pressurized containers.
A fuel leak is dangerous because:
- Fuel can ignite and cause a fire
- Fuel vapors can cause carbon monoxide poisoning in enclosed spaces
- Spilled fuel can contaminate your water or food
Before each trip, inspect the fuel canister:
- Check the seal for cracks or damage
- Look for dents or punctures in the metal
- Ensure the valve is tight and doesn't leak
During use, watch for leaks:
- Listen for hissing sounds near the fuel connection
- Look for fuel dripping from the valve or connection
- Smell for strong fuel odors (a sign of leaking vapor)
If you detect a leak:
- Turn off the stove immediately
- Disconnect the fuel canister
- Move the canister away from your tent and cooking area
- Let any spilled fuel evaporate in open air
- Do not use the stove until the problem is fixed
Check all fuel connections before lighting; the canister-to-stove connection should be tight, since a loose fitting leaks fuel.
Tighten the connection by hand.
Store fuel canisters away from heat; direct sunlight, hot rocks, or proximity to your stove can pressurize them dangerously.
Never store fuel canisters inside your tent; a leak lets fuel vapor accumulate in the enclosed space, creating a fire and poisoning hazard.
| Fuel Type | Best For | Key Safety Concern | Storage |
|---|---|---|---|
| Canister (propane/butane) | Beginners, lightweight trips | Pressure buildup, leaks | Cool, shaded location away from stove |
| Liquid fuel (white gas) | Cold weather, high altitude | Spills, carbon monoxide in tents | Separate container, away from heat |
| Alcohol | Ultralight trips, simplicity | Slow heating, invisible flames | Cool location, clearly labeled |
Common Mistakes to Avoid
Beginners make predictable mistakes. Knowing them helps you avoid them.
Mistake 2: Ignoring the flame color. A yellow or orange flame produces carbon monoxide, and beginners focused on cooking miss the change.
Mistake 6: Overfilling the pot. A full pot of boiling water is unstable.
Mistake 7: Cooking on unstable ground. Soft soil, loose rocks, or slanted ground can tip the stove.
Mistake 8: Not reading the manufacturer instructions. Liquid fuel stoves require priming and canister stoves have different valve designs.
What to Do During a Fuel Leak, Flare-Up, or Stove Fire
Emergencies require quick thinking. Knowing what to do prevents panic and injury.
Fuel Leak:
- Turn off the stove immediately
- Disconnect the fuel canister or shut off the fuel supply
- Move the stove away from your tent and gear
- Let spilled fuel evaporate in open air (do not wipe it up)
- Do not light the stove again until the leak is fixed
- If the leak is from the canister, store it separately and away from heat
Flare-Up:
- Turn the fuel valve to "off" immediately
- Step back and give the stove space
- Do not throw water on the stove
- Let the flames burn out naturally
- Wait 2-3 minutes before attempting to relight
- If flames spread toward gear or tent, use a fire extinguisher or water
Stove Fire (flames spreading to gear or ground):
- Use a fire extinguisher if you have one (aim at the base of the flames)
- If no extinguisher, use water or dirt to smother the flames
- Move flammable materials away from the fire
- If the fire is spreading quickly and you cannot control it, evacuate the area
- Call for help if available (cell service, nearby campers)
- Never put yourself in danger trying to extinguish a large fire
Carbon Monoxide Poisoning (symptoms: headache, dizziness, nausea, confusion):
- Move to open air immediately
- Breathe fresh air for at least 15 minutes
- If symptoms persist or worsen, seek medical help
- Never cook inside a tent or enclosed space again
Keep a fire extinguisher in camp if car camping.
Backpacking stove safety is about understanding your equipment and respecting the risks.
The Gas Backpacking Stove, Integrated Heat Collection Stove System, and Bio Stove Cooking Kit all feature stable bases, reliable fuel connections, and clear ignition systems.

Start with a practice session at home: light your stove in the backyard and get comfortable with ignition, flame adjustment, and shutdown.
Frequently Asked Questions
How do you safely light and turn off a backpacking stove?
Light your stove by first ensuring the fuel valve is fully open and the stove is on level ground. For canister stoves, ignite with a lighter or match held near the burner. For liquid-fuel stoves, prime the stove per manufacturer instructions before lighting. To shut down, close the fuel valve fully and allow the stove to cool before touching it. Never leave a lit stove unattended, and always extinguish it completely before moving or packing it away.
Can you use a backpacking stove inside a tent?
No. Never use a backpacking stove inside a tent or any enclosed space. Stoves produce carbon monoxide, which builds up quickly in enclosed areas and can cause poisoning or death. Set up your stove outside, at least 15 feet from your tent and sleeping area. Ensure adequate ventilation around the stove, and keep the area clear of flammable materials like dry grass, leaves, and tent fabric.
What should you do if a backpacking stove flares up?
If your stove flares up, immediately turn off the fuel valve to cut the flame. Do not panic or make sudden movements. Step back and let the flame die down naturally. Once cooled, inspect the stove for damage or loose connections. Check that your pot is stable and not tipping. If the flare-up was caused by a fuel leak or damaged seal, do not re-light the stove, repair or replace the part before using it again. Keep a small amount of water nearby for emergencies, but use it only if absolutely necessary.
How do you check a backpacking stove for gas leaks?
Before each trip, inspect your fuel canister, fuel line, and all connections for visible damage, cracks, or corrosion. Check that all fittings are tight and seals are intact. Look for O-rings that appear dried out or damaged. To test for leaks, apply soapy water to connections and valves while the stove is pressurized, bubbles indicate a leak. Never use a stove with a confirmed leak. Replace damaged fuel lines, seals, or O-rings immediately, and use only manufacturer-approved replacement parts.


